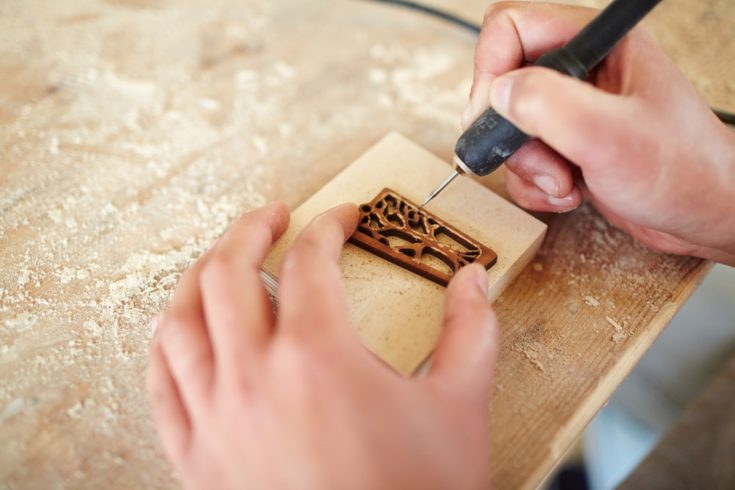
Woodburning, also known as pyrography, involves drawing an image on wood with a woodburning pen. There are plenty of crafts involving wood out there to choose from, but this one is exceptionally popular.
Burning designs and drawings into wood is lots of fun and a great stress-relieving activity, allowing you to have a creative outlet while doing mindful tasks.
But the best part of woodburning is that, along with being relaxing, the process results in something beautiful to show for it when you’re done. You can do it for yourself, or give it to a loved one. And, with the right techniques, you’ll be churning out nice looking projects in no time.
Simple Wood Burning Art Designs
Walnut Hollow Country Basswood Planks – Home Sweet Home
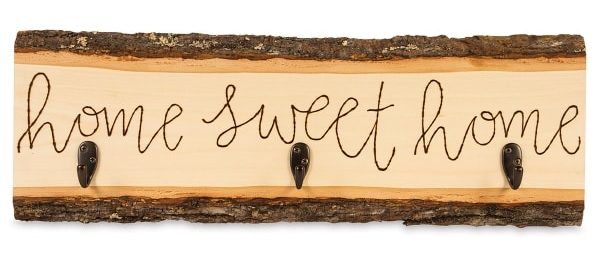
Making your own wood burning quote art is super easy and fun. We’re going to show you how you can make a super-simple “Home sweet home” lettering design on a piece of wood using a few simple tools and a wood burner.
Get It Here
Materials:
- A smooth wood surface in the size of your choice
- A wood burning tool
- A printed design
- Transfer paper
- Pencil
- Tape
- Pliers
- A ceramic dish
- Paint
- A paint brush
- Eraser or sandpaper
- A sawtooth hanger
- Hammer
Directions:
First you have to insert the universal point into your wood burning tool. Plug the tool in and put it in a safe spot, allowing it to heart for about five minutes.
You can opt for printing a design on a piece of paper, but you can also sketch your own design by hand. Place the design on the smooth wooden surface and fix it in a place with a few pieces of tape. Put the transfer paper in between your design sheet and the piece of wood.
Grab your pencil and trace over the design. The transfer paper will take care of putting the design on a piece of wood. When you’re done, remove both the printed design and the transfer paper.
Take the wood burned and begin tracing the lines over the design that’s now on your piece of wood. When you’re done, remove the hot tip from the wood burners using the pliers. Put the point into the ceramic dish and allow it to cool.
Use the pliers to add the flow point tip to the wood burning tool and allow it to heat as well. When it’s heated, you can fill the design. When you’re done, use a piece of sandpaper or an eraser to remove the pencil outline from your design.
Place a piece of tape under the design and paint the space below it all the way down to the edge of your piece of wood. Remove the tape and give the paint time to dry.
When the paint is dry, turn the wood piece and add the sawtooth hanger so that you can finally hang your masterpiece on the wall.
Bunny Rabbit
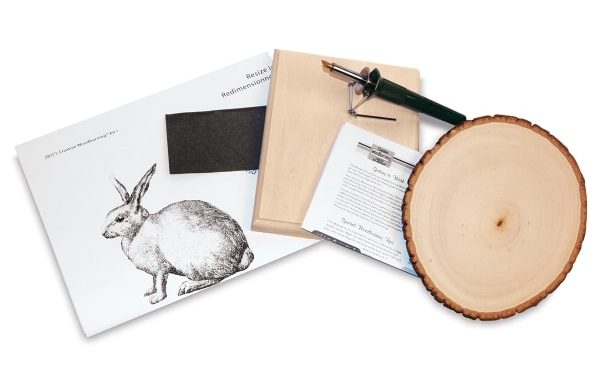
Who doesn’t love a cute animal drawing? Everyone adores a bunny rabbit, but you can replace it with just about any other animal you fancy, be it a puppy or an owl. The following idea can either be created using the same steps as above, or you can draw the bunny by hand, provided that you’re good at copying designs without the use of a wood burning stencils.
Get It Here
Materials:
- A wood burning kit
- A printed rabbit design
- A smooth piece of wood
Directions:
In order to make a bunny rabbit, you can basically repeat the process outlined for the “Home sweet home” project.
Alternatively, you can also make the rabbit without using a printed design, by simply copying an image found online and burning the wood without tracing the outline first.
Wooden Bamboo Cooking & Serving Utensils
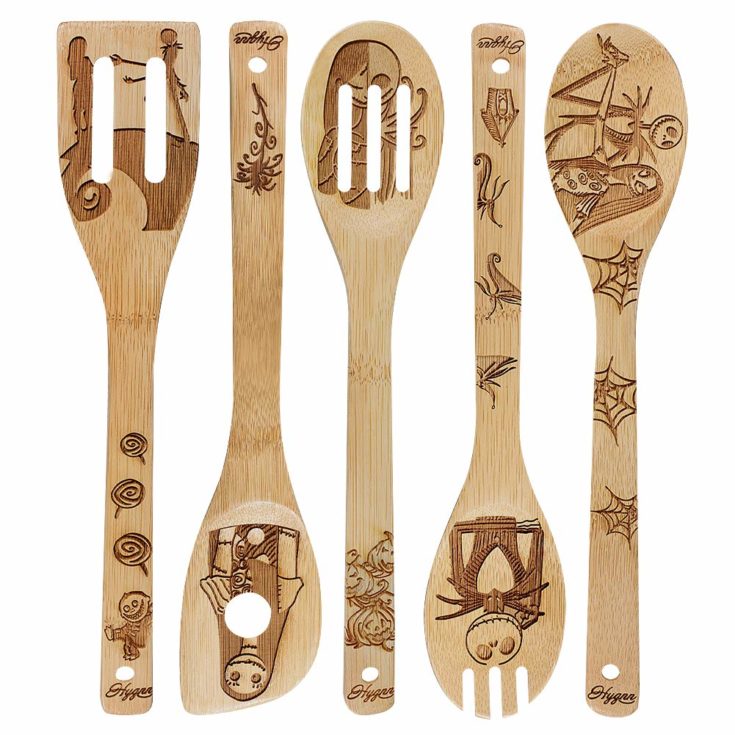
Everyone has those dull (but useful) wooden kitchen utensils that they use for cooking. Well, by using a wood burner, you can turn them into really awesome-looking tools, by drawing the elements you’d most like to see when you’re making your famous pasta. As always, you can print the designs on paper and then transfer them onto the utensils by using transfer paper and pencil, but you can also draw them from imagination or by trying to recreate a certain drawing from the back of your mind.
Get It Here
Materials:
- Wooden kitchen utensils
- A wood burning kit
- The designs of your choice
Directions:
If you’re opting for a simple design (or if you’re really good at drawing), you can just heat up your wood burner and “freestyle” your drawings directly onto the utensils.
Alternatively, you can also print your favorite animated characters, the geometrical design of your choice, or whatever other images you’d like to burn onto your utensils. From there, it’s just easy to follow the steps mentioned during our outline for the first project.
Woodburned Cutting Board
A cutting board is basically an invitation to put that wood burner to good use. It’s already a flat and smooth piece of wood that serves as a canvas for your imagination, allowing you to customize it and then proudly hang it on your wall.
Materials:
- A cutting board
- A wood burning kit
- The printed design of your choice
- Pencil
- Eraser
- Tape measure
Directions:
Print the design you want to burn on your cutting board. Flip the design over and then use the pencil to color everything you want to burn on the wooden cutting board.
Flip the design back with the printed part up, and then secure it to the cutting board using measuring tape. Make sure that you don’t stick any tape on top of the actual design. Grab your pencil once again and then outline your design by pressing as hard as possible. This will transfer the pencil drawing on the back of the paper to the cutting board. Alternatively, you can also use the transfer paper method we’ve talked about earlier.
Remove the paper from the cutting board. You can use the pencil to draw clearer details on the board if you feel the need to do so before you actually start burning the wood.
Heat the wood burning pen and start drawing the outline. For finer details, you might want to switch the tip of the wood burning pen to something a little sharper. Take and eraser and clear any of the visible pencil lines that might still be seen on the board.
Beer Tankards
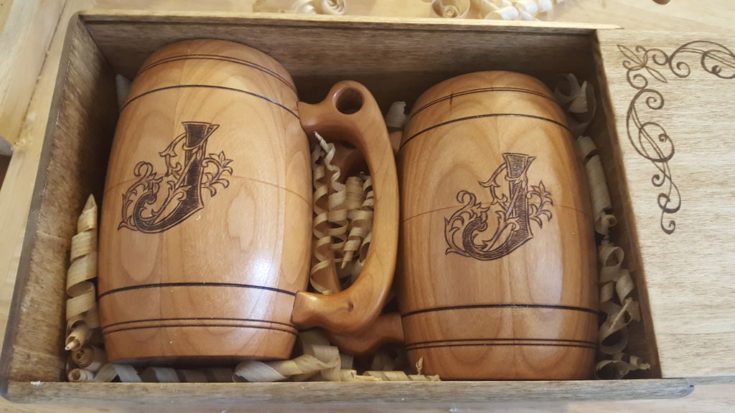
Beer tankards can be a more complicated project since you have to burn a piece of wood that’s shaped like a cylinder. However, once the project is finished, you have a wonderful item to take pride in.
Materials:
- Beer tankards
- Wood burning tool
- Printed design
- Transfer paper
Directions:
For the best results, it’s better if you transfer a printed design onto the tankard, so you can find it easier to recreate the image or lettering of your choice.
Simply place the transfer paper onto the mug, then place the printed design on top, securing them both using tape measure. Draw over the printed design using a pencil to transfer the image. Then, remove the transfer paper and the drawing and use your wood burner to draw over the sketch.
The Beauty of Handmade Projects
We all know that one relative or friend who is impossible to shop for or who already has everything they want and need. This is why knowing how to create beautiful, handmade items is a great skill to have.
Plus, wood is a versatile and attractive material that complements most types of décor.
Of course, you will want to have a grasp of some basics before you get started, such as the proper safety measures to take and making sure kids are supervised while woodburning. You will also need to purchase a quality tool for woodburning.
Once you do this, you are ready to begin and you’ll soon discover that the ideas for what you can do with this skill are endless. Let’s look at some unique woodburning ideas you can start with.
The Classic Woodburned Sign
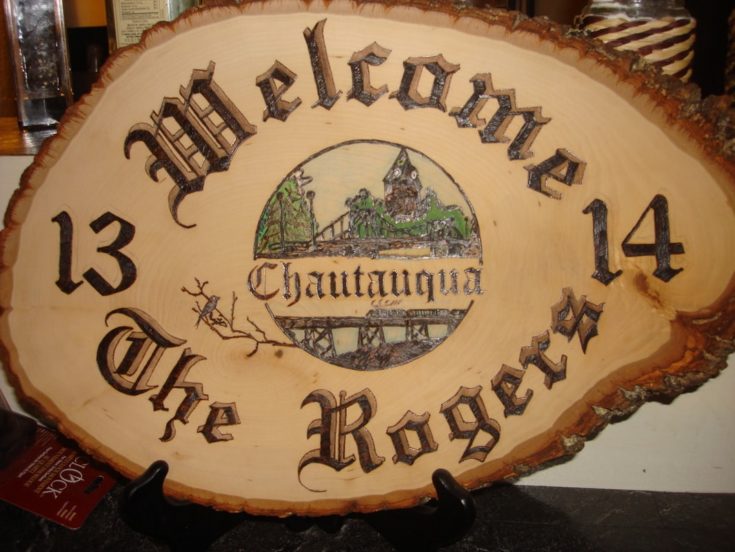
Most of us have seen at least one of these before. Perhaps you have a business that could use a sign over the door, or you simply want to let visitors know where the Johnsons live the first time they come over. Either way, a woodburned sign is a classic, earthy-looking, and elegant way to do this.
Woodburned Kitchen Spoons
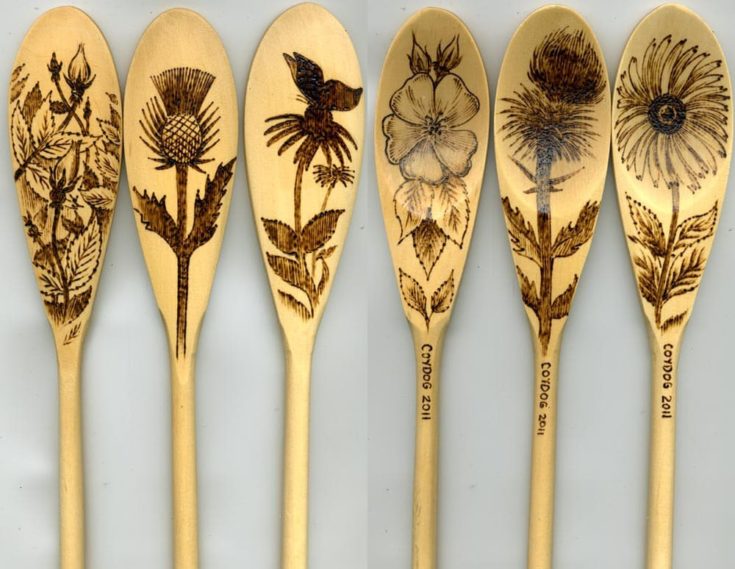
A wooden kitchen set, complete with spoons and a spatula, can be a good choice, and you can make it personal (in addition to practical) with some added designs.
You don’t have to be an artistic genius to make something nice; simple patterns will look great, too. Or make your own set and hang them on your kitchen wall as decorations instead of using them.
Decorating Wooden Buttons
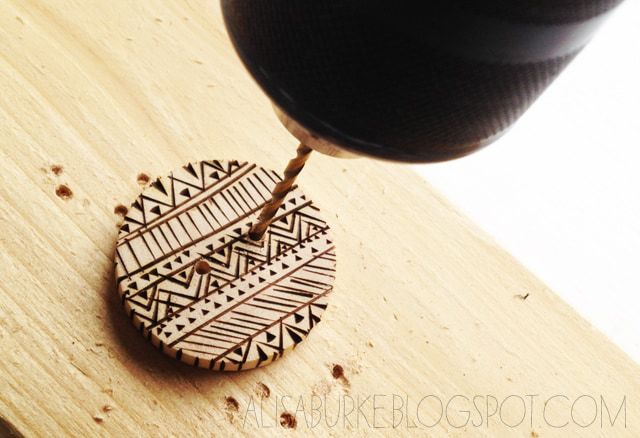
Do you know someone who loves the outdoors or tends to dress in natural or nature-inspired tones? Then woodburned buttons are a great gift idea.
These are an especially nice addition to knitted or flannel clothing. You can do simple dotted designs or something more elaborate according to your personal taste.
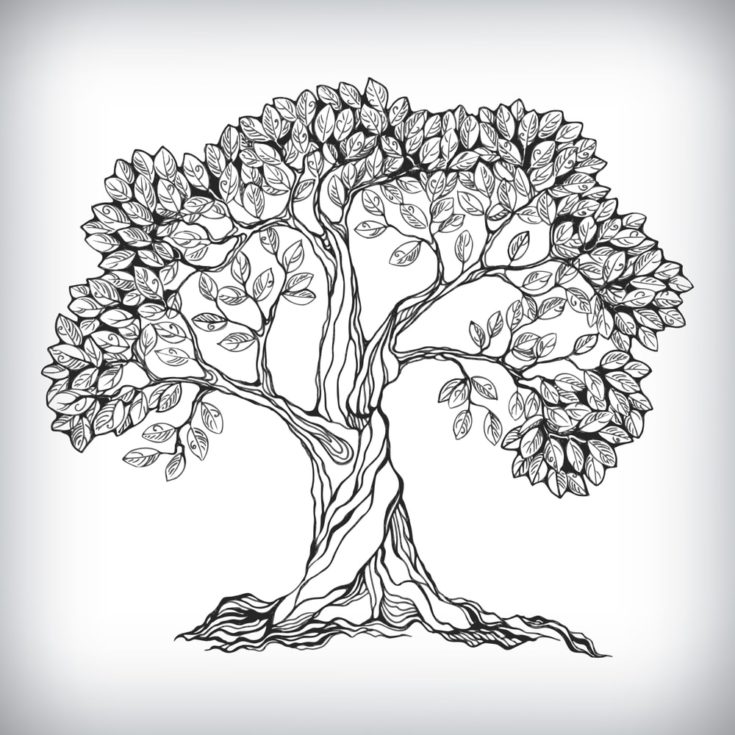
A Woodburned Picture Frame
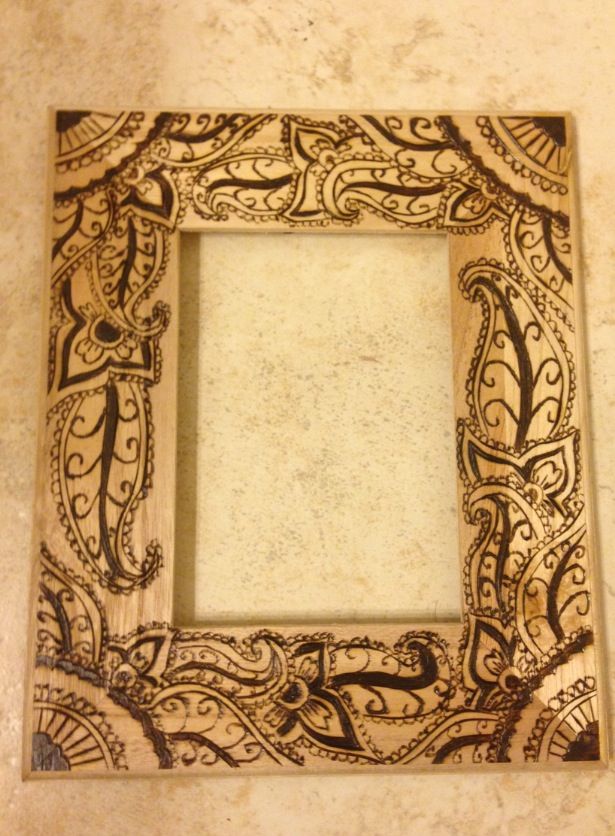
Framed photos are a classic idea, and making etched designs around the frame makes it even better. The best part of this project is how personalized you can make it.
For example, if you are framing a photo of a fishing trip, you can etch relevant designs, like swimming fish and hooks, around the photo. For a framed picture of your son’s baseball game, make little pictures of baseballs and baseball hats along the edge.
Here are some of the best wood burning border designs you can use for your frame and when hanging you should get yourself a good laser level.
A Woodburned Chopping Board
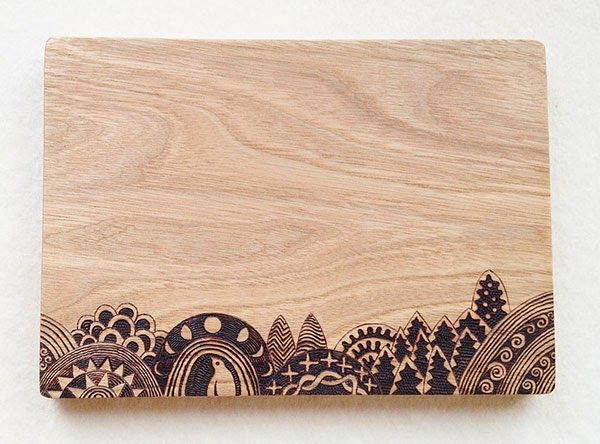
This is another creative idea (like the wooden spoons) that can be made for practical purposes, or simply as something nice to hang in your kitchen.
If you know someone who loves to cook, this is the perfect chance to get them something they’re sure to use. Abstract designs or nature-inspired themes (like leaves and vines) look great on cutting boards.
Wooden Children’s Building Blocks
If you’re expecting, know someone who is, or already have a small child that could use a new toy, look no further. You can create your own wooden building blocks at home.
Go with the classic alphabet design or create toy buildings. In this day and age, where most people buy easily replaceable toys for their kids, a handmade item like this is sure to impress and last a lifetime. Read more detailed instructions on how to create these here.
Woodburned Clothes Hangers

Have some old coat hangers made of wood in your closet? You can spruce them up by adding some woodburned designs. Make flowers, mandala patterns, or simply etch the days of the week onto your hangers so you can plan ahead with the shirts you’ll wear to work and have an easier time getting ready in the morning.
The most commonly used woods are poplar, birch, and basswood, and they have lower levels of toxins. Pine is a popular choice as well, but creates more fumes than the other three types. To find out more about woodburning safety and toxicity and ensure you take the proper precautions, read this article.
Life is too short to give items that no one will remember, or to hang decorations in your house that are generic and boring. The ideas above should get you started, but once you begin, you’ll find plenty of surfaces to improve with your woodburning pen.
Wood Burning Boxes
Woodburned Legend of Zelda Box
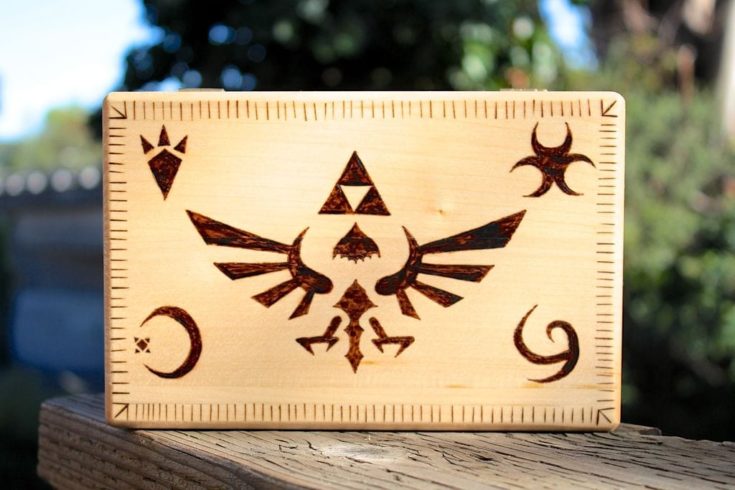
The following tutorial refers to the ever-so-famous video game franchise The Legend of Zelda. It’s a super-simple project that shouldn’t take up more than three hours of your time. The result is an intricate Zelda-themed box.
Materials:
- A clean wooden box
- A printed design of your drawing template
- Wood burner
- Tape
- Pencil
- Sandpaper
- Pliers
Directions:
To transfer the pattern, you can rub a pencil on the back of the design. Then, tape your printed design on the box and use a ballpoint pen to recreate the outline.
Leave the wood burning pen to heat up for a few minutes. Outline the drawing using a shading tip. Use the same tip to fill in the drawing. You can use the pliers to switch to the universal tip when you want to make fine detail adjustments.
Jewelry Box Wood Pyrography
If you have a small and dull wooden box lying around the house, how about turning it into a beautiful and unique jewelry holder? All you really need is some transfer paper and a wood burning pen. Alternatively, you can also choose to hand-draw the design directly onto the box, although we do recommend making a pencil sketch first, so that you can erase and redraw details if need be.
Materials:
- Wood burning pen
- Transfer paper
- Printed design of your choice
- Pencil
Directions:
To make an intricate jewelry box, you’ll first have to find a design that you’d most like to see on it. Print it out, and then secure it onto the box, making sure you’ve placed the transfer paper between the box and the design.
Using a pencil, draw the outline of your design to have it transferred on the wood. Remove both pieces of paper. Heat up your wood burning pen for a few minutes, and start drawing the outlines over the pencil sketch. Fill in the design if necessary.
Old Fashioned Recipe Box
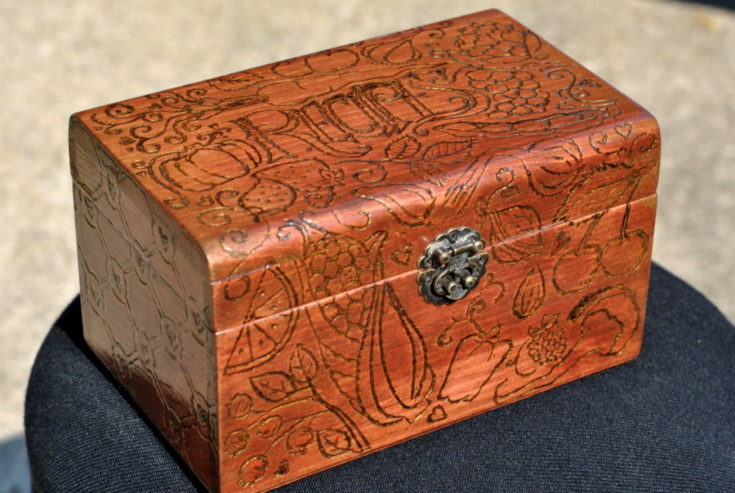
There’s something about wooden recipe boxes that reminds us of childhood, back in the days when our grandmothers and mother didn’t really have dozens of recipe books lying around the house. They would make these little recipe cards that were stored either in a box or cramped inside some drawer. If you like cooking the old-fashioned way, you will love with wood burning project.
Materials:
- Wood burning pen
- Standard wooden box
- Stain
- Clear coat
- Sandpaper
- Scissors
- Tacky glue
- Screwdriver
- Scrapbook paper
Directions:
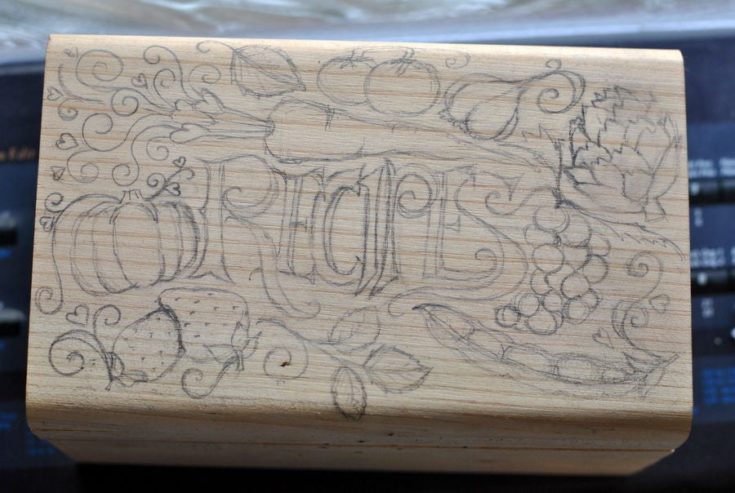
Remove all pieces of hardware from your small box. Sand the wood to make sure there are no rough spots that could damage the project. Draw the design on the box by using a pencil, or use the printed design method to transfer the images onto the box.
Heat up your wood burning pen and start outlining the drawings. You can now use the stain to add a coat to your box.
Proceed to cutting a thin layer of paper liner to decorate the inside of the box, and then use the tacky glue to secure it in place.
You can use polyurethane for the clean coat application. Alternatively, you can spray the box with clear gloss, to give it a nice shine. After setting the box aside to dry (leave it for as long as it takes), put all the hardware pieces back in place.
Wood Burning – Small Box
Most of us have small boxes lying around the house that we either use or stored somewhere in a dark corner in the pantry and forgot about. What if I told you can turn even the smaller and seemingly ugly-looking wooden box into something that you’d gladly place somewhere in sight?
Materials:
- A small wooden box
- Pencil
- Wood burning pen
Directions:
Using a pencil, sketch a simple design on the top surface of the wooden box. If you want, you can draw on all the surface of the box. You can also use the transfer paper method if you’re not that keen at drawing by yourself.
Allow the wood burning pen time to heat, and then use it to remake the outline of the design. You can also use it to fill the design if need be.
Cool Wood Burning Designs
Ash and Pikachu Wood Burn
Based on the famous RPG series developed by Nintendo, we wanted to show you a wood burning project featuring the forever-loved characters of Pikachu and Ash. This project is ridiculously simple, and a great souvenir for true Pokémon fans.
Materials:
- Small square wood piece
- Wood burning pen
Directions:
Since the project involves quite a simple outline and plenty of fill, most of you will be able to create it without using any transfer paper and printed design (there’s no shame in doing that, by the way).
Just draw the outline of the image and then fill in where needed.
Darth Vader Wood Burning
How do you even write an intro about Darth Vader without giving any spoilers (although, if you haven’t watched a single movie in the Star Wars series by now, you’ll probably never be tempted to watch it in the future). Known as one of the most beloved negative characters in the history of cinema, Darth Vader is a symbol of this movie franchise, and can now be a great project for people who are into wood burning.
Materials:
- A printed image of Darth Vader’s head
- Printed image of the Star Wars logo
- Wood burning pen
- Smooth and flat piece of wood
Directions:
Take a piece of wood and add the Star Wars logo on the bottom side, making sure you use the same font as the franchise, for optimal visual effects.
Heat up your wood burner and create an outline that you can draw yourself, or transfer on the wood using transfer paper and the printed design of Darth Vader and the Star Wars logo.
R2D2 Woodburning Clock
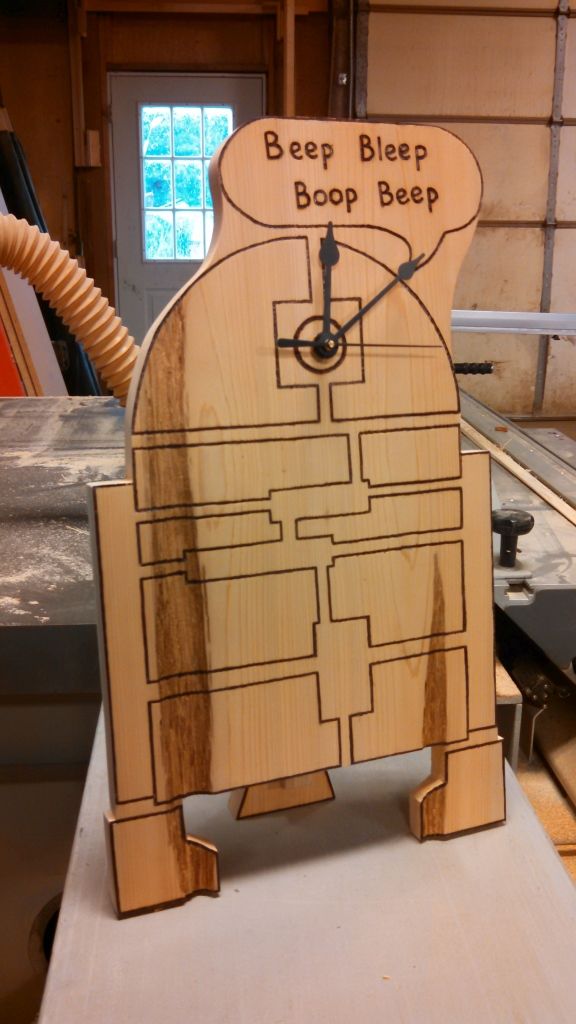
Yeah, yeah, we do love a good Star Wars reference. And if you’re not a Darth Vader fan, you most certainly have some sort of affinity for R2D2, one of the characters that made an appearance in all the Star Wars movies. So, are you ready to make your own R2D2 wall/desk clock?
Materials:
- A large rectangular piece of wood.
- A clockwork kit
- Printed R2D2
- Transfer paper
- Pencil
- Wood burning kit
- Wood to make a leg
Directions:
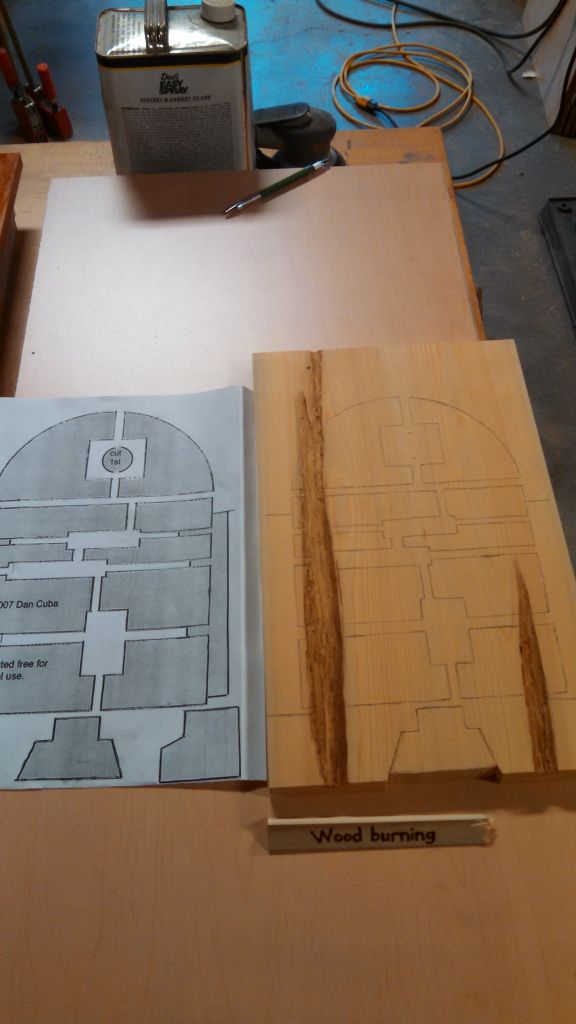
Use transfer paper to recreate the design of your R2D2 onto the piece of wood. Heat up your wood burning pen and start redrawing the outlines.
When you’re done, place the hands of your clock where you want them to be. You can use a scroll saw to cut the top part of your clock for a much nicer design.
Attack your clockwork kit on the back of the wood, making sure it has some sort of hook so that you can later hang it on the wall if you want to.
On R2D2 middle leg, you can mount a small piece of wood with a bevel cut at the top. This will allow you to place the clock on a flat surface.
Wood Cufflinks
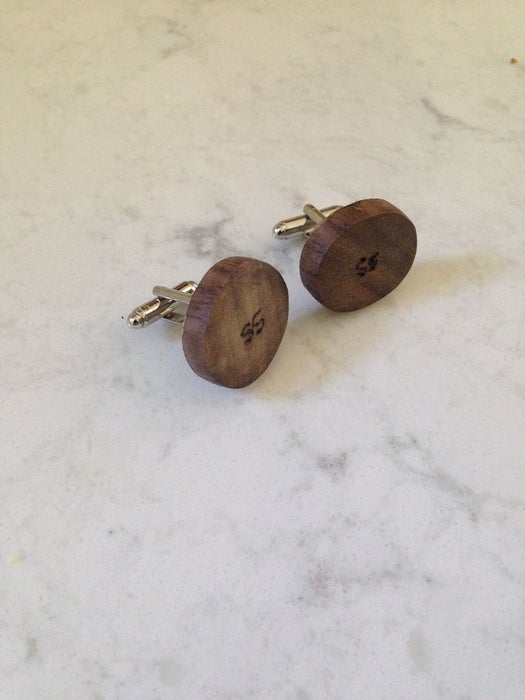
Cufflinks can be quite dull and easy to get your hands on. But wooden cufflink that you can engrave with just about anything you want? Now that’s a collector’s edition item if I ever saw one. Below, we’re going to give you a full tutorial on how to make and burn your own wooden cufflinks from scratch.
Materials:
- 1×1 inch stock of wood, 10 inches long
- Cufflink backings
- Clamps
- Radial arm saw
- Router
- ½ inch round over router bit
- Sandpaper grits
- Paint thinner
- Epoxy
- Wood burning kit
- Wax/polyurethane finish
Directions:
Clamp your wood to a sawhorse and use the ½ inch round over on each edge. Use the router to mile the dowel and sand it by hand.
With a radial arm saw, cut the links off the dowel into the size of your choice. Use paint thinner to remove any dust from the cufflinks. Scuff the face of the metal backing using sandpaper for better adherence.
Put one drop of epoxy on the back of the wooden links, and then attack the metal backing according to the instructions of the epoxy label.
Use sandpaper to polish the face and sides of your wooden cufflink parts. Grab your wood burner and carve whatever lettering or design you choose.
For a finishing touch, apply a coat of wax to give the wood a nice shine that will also protect it.
Conclusion
Now that you’ve gotten a glimpse of the awesome designs and projects that you can create with a simple wood burning kit, is there anything in this list that you fancy making on your own?